
It is my turn again to post for Donna Salazar Designs with a step-by-step tutorial on what happens when I let my creative juices take control of pretty papers, inks and glue...
**click on picture to enlarge (which incidentally also sharpens the image} **

This month we focussed on the fabulous Crafty Chronicle, which I adore so much that I can hardly bring myself to cut it up and use it, but alas this month I had to bite the bullet :)
The travel section of the Chronicle is definitely my favourite, the vintage images and quotes just make me happy. It was clear to me right from the start that I wanted to make use of a complete page of the Chronicle to use as my layout base.
First, I used a variety of Smooch Spritz in Tea Party, Wood Stain and Caramel Latte to spritz gently over the paper. To add some more texture, I used a Crafter's Workshop Stencil template and brushed over it with some gesso. Once the gesso dried I adhered a little strip of punchinella, with the help of some masking tape, to the paper. Masking tape will lift off the background without damaging your paper or previously stamped/stencilled paint.

For the smaller circles of the punchinella, I decided to use the Smooch paint from Clearsnap as it has a wonderful small brush already attached and helps to paint smaller areas. I actually don't mind that some of the paint smudged between the circles - I love my paints to get messy :)

Finally I lathered a sheet of bubble wrap with some Smooch Spritz in Green Olive and Caramel Latte and pressed this on the opposite side of the page.

All I needed to do now was tear of strips of paper along the edges to fit an 8.5 x 11 page and ink the edges with Clearsnap's Cats Eyes Chalk Ink in Dark Moss, Chestnut Roan and Dark Brown. Take a sheet of the wonderful Artistic Papers (in this case I used the calendar one), flip it over and cut it to 8.5 x 11 size, as this will be your piece of cardstock, to back the Chronicle paper.

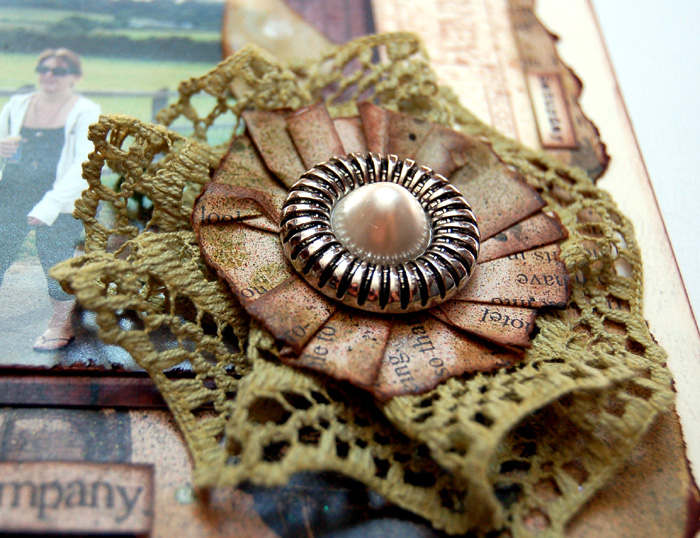
From tearing the paper to size, I had a few strips left over and one was big enough to "rescue" and create a flower from it.

Just fold in a concertina style as described HERE and press it down. This time I wanted to achieve a flattened look and so I simply pressed hard onto the top f the rosette, inked the edges with Cats Eye Chalk Ink in Chestnut Roan and fastened the rosette with a glue dot to a piece of cardstock. I still wanted to add a little extra and attached an older piece of lace to the back of the flower with the help of my stapler.

Now I just added one of the gorgeous Vintage Buttons I got from Donna's Etsy shop years ago and my flower was ready to go.

I finally added some bits and pieces of left over strips of paper (usually the scraps when I cut the 12 x 12 sheets to my preferred size of 8.5 x 11), attached the flower and one of the fabulous quotes from the Chronicle.
Products used
- Papers: Donna Salazar for GCD Studios - One Sheet Wonderful - Antiquities, Crafty Chronicle, Artistic Papers - Calendar
- Mists: Donna Salazar for Clearsnap - Smooch Spritz in Wood Stain, Caramel Latte, Tea Party, Green Olive
- Inks: Clearsnap Cat's Eye Chalk - Chestnut Roan, Dark Moss, Dark Brown
- Paint: Clearsanp Smooch in Molasses
- Button: Donna Salazar Vintage Button
Stickers: Jillybean,Pens - Uniball Signo in white
Lace- Rusty Pickle
Stamp - 7Gypsies,Bubblewrap
Stencil - Crafter's Workshop, Punchinella
Tweet
awesome design- love the background!
ReplyDeleteGorgeous, I love your flower! :)
ReplyDeletewow, gorrrr-geous! i'm no good at this kinda stuff, so thanks mucho for the tutorial!!
ReplyDeleteWhat a fabulous page, Kim! I am constantly amazed at the artsy and fantastic backgrounds you create. You are just the queen of spritz and spray backgrounds! LOVE that you used an entire sheet of the Crafty Chronicle and love the bubble wrap and punchinella effects. Fabulous flower and photo, too. :)
ReplyDelete