Showing posts with label Bloghop. Show all posts

Saturday, 5 November 2011

Handmade Holidays Blog Hop

Welcome to the Handmade Holidays Blog Hop!!!

Calling all crafters! We’ve gathered designers from some of our favourite manufacturers to show you ways to create something from the heart this holiday season. This 3 day Hop includes over 60 stops with inspiration brimming from every corner. Explore all thoughtful and frugal handmade gifts you could make for the holidays, all in one place on this Hop!

To sweeten the Hop, we’re offering a gift for you! For every comment you leave on the blogs in the Hop, you’ll be entered to win a prize pack from one of the participating manufacturer sponsors!

Donna Salazar Design's is giving away this beautiful package:
**Winner MUST be in the US. We are very sorry but international entries can not be accepted for this particular prize due to its weight of the Zutter tool**

Visit the list of blogs below and leave a comment on each by Nov 7, 2011 at 11:59 PM PST. Each day we will be sharing a brand new list of blogs with brand new projects for you to explore, be inspired by, and create from! 

Clearsnap – http://clearsnap.blogspot.com
Spellbinders  http://www.spellbinderspaperarts.com/Community/Blog.aspx
Hampton Art - http://blog.hamptonart.com/
Zutter – http://binditall.blogspot.com/
Graphic45 – http://g45papers.typepad.com/
Donna Salazar Designs – http://donnasalazar.typepad.com/
The Twinery - http://www.thetwineryblog.com/
Authentique Paper http://authentiquepaper.blogspot.com/

Glue Arts - http://gluearts.blogspot.com/
Jan Hennings – Glue Arts http://papercraftpleasures.blogspot.com/
Kim Sonksen – Donna Salazar Designs  - YOU ARE HERE, RIGHT NOW
Jamie Harper – Hampton Art www.jamieharper.typepad.com
Jenny Suchin – The Twinery http://www.suchins.blogspot.com/
Heather Conklin– Authentique Paper  http://goldiecar.blogspot.com/
Gloria Stengel- Graphic 45 http://gloriascraps.blogspot.com/
Christine Emberson - Spellbinders http://hope-chances.blogspot.com/
Julie Overby – Spellbinders http://joverby.blogspot.com/
Mary Dawn Quirindongo – Clearsnap http://mypinkmexico.blogspot.com/
Lea Sanders – Zutter http://leasanders.wordpress.com/
Tara Orr – Graphic45 http://eachmoment-onlyonce.blogspot.com/
Patti Milazzo – Glue Arts -  http://pattimilazzo.blogspot.com/
Emily Lanham – Authentique Paper http://createserendipity.blogspot.com/
Jessy  Christopher – Donna Salazar Designs - www.teacherjessy.blogspot.com

Cheers to creating gifts from the heart this holiday season!
 Happy Hopping

Before you start off on your hop, would you like to see what I have whipped up for ya?

What about this lil’ fella brightening up your home or to be given as a small gift?

You can leave it as is or fill it with some candy, small gifts (maybe a voucher?) or whaterver else you can think of.
So, how did I do it?

First gather a sheet of 12 x 12 double sided paper. It is not essential that both sides have a pattern but you can be so much more creative with it if it does. I chose the “Do You See” paper from Donna Salazar’s 

As I wanted my ball to be fairly small, I decided to cut the paper in half so I was left with two sheets of the size 6 x 12 – for one ball one of these pieces is sufficient.
Now you will need to cut the sheet into individual pieces, making sure that the length of each strip is 6”. The width depends on personal preference and I decided to go with 1” wide paper strips.

I decided that I wanted to showcase both sides of the paper in alternating strips and I wanted to add some wintery-kind of texture to them. First I sprayed them all with Vanilla Smooch Spritz by Clearsnap Inc and sprinkled some white embossing powder randomly into the still wet Smooch Spritz.
The edges were then inked with Cat's Eye Chalk Ink in chestnut roan

 Isn't the effect marvellous? It turned out so much better than I anticipated.

Now you will need to gather your strips and punch a whole on both ends of each strip - I find it easiest when you place them all on top of each other and use the Zutter Hole Punch and Hammer, that way you can be sure that the holes are all in the same area.

Now you can secure the top on bottom with the aid of some Zutter Rivets. They snap together so easy and hold the strips together perfectly.

But how do you get this array of strips into a ball? Well, you will have to fan them out and the easiest way to achieve this is to bend the strips with one hand like this:

With your other hand you will be able to fan out each strip, you can start from the inside out or vice versa and your ball should start to look like so:

Once you have finished arranging the strips you can think about how to decorate the outside of the ball.
I hand-cut a small tag from one of the Artistic Papers of Donna Salazar Designs and stamped it with a holiday image, using various Cat's eye chalk inks. From the "Weathered Mosaics" paper I cut a sentiment mosaic into smaller tag and attached this to the stamped tag


Finally I cut some leaves from the fabulous 8 x 8 Spring In Bloom papers pad of Donna Salazar Designs and added some Fairy Dust Glitter in Sugar Shimmer by Donna Salazar for Clearsnap to the edge for an added "frosty" look.

There you have it - a quick decorative ball, which can be used to house small gifts.
I hope you enjoyed this tutorial and don't forget to leave a comment on all hop stops in order to be in with a chance to win some FABULOUS prizes (just in time for the holidays :)))

Saturday, 12 June 2010

Some Odd Girl is BLOG HOPping


Welcome to the FIRST Some Odd Girl Blog Hop! We are happy you've joined us and I know the ODDies have a ton of goodies to show you! So just take the journey thru the blogosphere and not only will you see some lovely projects but you will get some sneaks of our June 15th release! If you just happened upon my my blog please start your hop at the {{ Some Odd Girl Challenge blog}}  and make some ODD stops on each of our ODD Girls' blogs finishing up at Kristy's blog.


Your should have arrived here from {{ Ann's blog }} but should get lost during the hop, below is the list of ODDies in order of HOP :)


Kimmy You are HERE


AND if you leave all the ODDies a lil' love you may just win our WHOLE June 15th release! Yup, that is seven (!) Digi Stamps in a total value of $21.00!!!! You would be silly not to get in with a chance here. So you better start hopping.


Before I send you on your merry way to the next stop, I would like to share a little tutorial with you. If you are anything like me, you freak out at the thought of colouring digi images...in particular when you see the amazing work a lot of artists out there produce with their Copics or ProMarkers. But you know what? It is not that difficult...seriously, just have a look:


Please excuse some of the blurry pictures - I only had the chance to to the tutorial in the evening and I just could not get them into focus without the flash (and with the flash you would have not seen the different shades)


** click on any of the images if you want to view them larger **


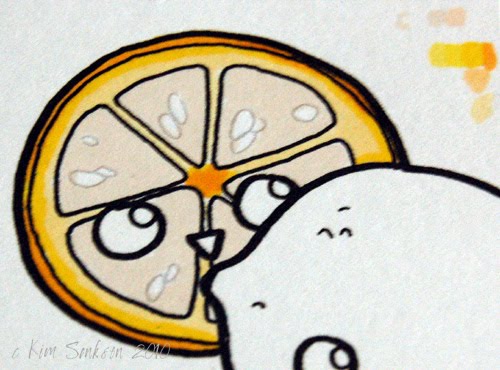
First off you print you image onto some white cardstock and choose the colours you want to use for the colouring. For my example I am teasing you with an UPCOMING digi stamp....yep, it is true you cannot get this fella just yet: LEMONEY is part of the next release, going live on 29 June 2010....but don't be too sour about it  *giggles*


First, I started with the flesh of the lemon and used the SATIN colour in small circular motion to colour the areas, leaving the pips to remain white. For small areas you want to use the pointed tip of your pen. Both ProMarkers and Copics have a wide and a pointed tip :)


Using the different shades of yellow, I started with the lightest to colour the outside of t he lemon segments, and the further I came to the outside of the slice, the darker the colours I used.


Can you see the little colour marks on the top right of the image? I do that for all images I want to colour - have a few strokes of the shades I have chosen next to another, to see how well they work. Additionally that will give you a chance to see how much your cardstock may allow the colours to bleed - some cardstocks are worse than others.


For the colouring of the lemon at the front, I used the wide tip of my pen, which will prevent uneven colouring. If there are some small white spaces left close to the edge of the image, don't fret about it - your colours will run a tiny bit anyway. You are also very likely to add a darker colour to the edge, so any missed areas will be covered eventually.
If at any stage when you started using darker shades, feel that the contrast looks too harsh: just go over the WHOLE of the area with the lightest colour you used previously. This process will start blending the colours together - the longer you brush over the area, the wetter the cardstock gets and you can pretty much rectify small mistakes with it, as the darker shade as good as blends away.


I like working in a "feathered stroke" fashion when starting to shade. That means that you very lightly use the pointed tip of you pen and work in strokes from the outside in. If your coloured area is still wet, the light strokes will blend into the background perfectly. The above picture was taken right after I applied the strokes and the area was still very wet, hence the huge contrast.


When the area was drying, I found the contrast remained too harsh, so I added more feathered strokes, this time with the lighter colour which was used for the main body of the lemon.


Again, the picture above was taken while the area is still wet to hopefully show you how the different colours now start the blending process


Finally I was happy with the shading and after I added some colour for the eyes, I used a grey ProMarker pen to add a slight shade to the left edge of the front lemon - as in a real life picture, it would cast a shadow on the slice in the background....


So watcha think - easy or not? Personally, I think the colouring is MUCH easier than it seems if you only look at the finished project.

Okay then, I have kept you for too long already - head over to Mrs ODD, i.e.
{{ Kristy }} now, to finish off the hop and see what she has got in store for you.


Thanks for hopping with us and if you fancy some more ODDness and more chances to win FREE ODD stamps - why not join us RIGHT NOW over at {{ SNR }}, where we are holding our very first DIGI DAY... woop woop!!! We have challenges, prizes, FREEbies and I recall Mrs ODD mentioned the word SALE during one of our email conversations....so you better go check it out :)


Wanna know what the FREEbie looks like? I am totally into retro 50's right now, so I squealed with delight when I saw this lil' lady

Sunday, 14 February 2010

ScrapMuse Bloghop Spread The Love

Welcome to the "Spread The Love" blog hop for ScrapMuse

You are at the very beginning of our blog hop.Take the time to leave some love on each design team members blog post for the blog and once you have visited (and commented on) all blogs, leave a comment on the ScrapMuse blog to let us know about it.

Here is our blog rotation for this evening

1. Kimmy >>> that's me - you are already here :)
2. Ruth
10. Chiqui
12. Kristy

ScrapMuse is a mid-month kit club which will soon be celebrating their 6th year of offering kits that feature all the latest and greatest scrapbooking companies such as Basic Grey, Pink Paislee, Prima Marketing, Fancy Pants Designs, Jillibean Soup and so much more! ScrapMuse publishes a monthly newsletter featuring great technique articles, inspiring layouts and fun tips. At the ScrapMuse website you will find an active, friendly message board and gallery.

For information about ScrapMuse’s monthly schedule, including kit reveal, shipping, payment dates, and to sign up for the monthly ScrapMuse kit, please visit the Join Us page or email melissa@scrapmuse.com. Three and Six month prepaid subscriptions are available now in the store. All memberships and subscriptions will begin with the March 2010 kit.

I know that there are many cardmakers out there, who always feel a little left out when it comes to Monthly Kits. Personally I think that ScrapMuse fills this void - as their Kits are so chuck-full of gorgeousness that it would be rather more difficult NOT the create cards from it.

You will always find oodles of embellishments with your ScrapMuse Kits, which allows for some real quick cards to be made. My favourite card made with the December Specialty Kit FAMILY TIMES, is this one:
It took all but five minutes to get this critter done - the Chipboard shapes really help in getting a quick card ready when you are stuck for time.

The same pretty much applies to one of my favourite cards made with the January Specialty Kit SPACE COWBOY.


Isn't he fun?? And again totally quick to do as the robot was just cut from the paper and spruced up with some of the stickers supplied with the Kit. 

You can still order the Family Times Kit but Space Cowboy is sold out (see, you should have listened to me and bought it when I first showed ya!)

Now, please hop over to Ruth to catch more fun ideas on how to use your ScrapMuse Kit. *** Please note that due to some scheduling issues, my post is one day early - so please hop over to Ruth on the 15th of February ***

Thank you for visiting us all today, we hope to see you on our Forum and have you join the fun of our month-long celebration of Love and ScrapMuse

Monday, 8 February 2010

myStampBOX - Blog Hop ** JUST ADD SWEETS **

Welcome to the Just Add Sweets Blog Hop with myStamp BOX today!

If you have just happened upon my blog today, you may want to head to the start of the blog hop today, the myStamp BOX blog

Here is our Just Add Sweets Blog Hop schedule just in case you missed anyone:
- Tracey Taylor
- Tina McDonald
- Virginie Delbecq
- Marci Knecht
- Allison Cope
- Cherie Nymeyer

- Gudrun Loennecken
- Liz Jacob
- Ellen Sosnoski
- Kim Sonksen ---- that's me :)
- Nathalie Kalbach
- Jolene Johnston
- Elisa Kammerdiener

The design team's challenge was to take the theme of our blog hop and apply the colours of white, pink and orange to their creations.

Initially I was quite stumped as I am not really someone who creates anything to do with candy or sweets, but when our DT Coordinator, Ally, told me to think outside the box - maybe along the lines of SWEETheart - I was up and away :)
Ingredients:
Cardstock: Papemill; Bazzill; Stampin' Up
Papers: American Crafts; My Minds Eye
Stamps: myStamp BOX - FUNKY ALPHABET, HAPPY BIRTHDAY
Tools: Border Punch - Stampin' Up, Fiskars


For participating in the blog hop by leaving a comment on each and every participating myStamp BOX designer's blog, you have a chance to win a set of brand new stamps sets being released this month! So leave a comment on all the blog posts and then return to the mSB blog and tell us what you favourite project was along the way for a chance to win! Have fun!

Please hop along to the next designer, my dear friend NATHALIE to check out her sweet work!