Showing posts with label Home Decor. Show all posts

Sunday, 13 November 2011

Donna Salazar Nov I

This post went live earlier on the Donna Salazar Designs Blog.

Today I have a post for Donna Salazar Designs with a step-by-step tutorial on how to create this funky mini pizza box.
I found the original instructions for this gift box on Splitcoast Stampers.

This month, we are focussing on gifts, Christmas cards and home décor, so when I found the instructions for this gift box I was all over it :)))
I am always on the look out for different kind of gift wrapping/boxes that are not specific for any season.

Anyway, let's get started.
First you need a sheet of double sided paper (or cardstock) of 6 x 11" size.
I chose the Weathered Winter sheet from the same named CHA2010 paperline

Once cut to size you will need to score the sheet (6" width facing upwards) at 1" and 5" downwards

Then flip the sheet to the side so the 11" width is facing upwards and score at 1", 5", 6" and 10"
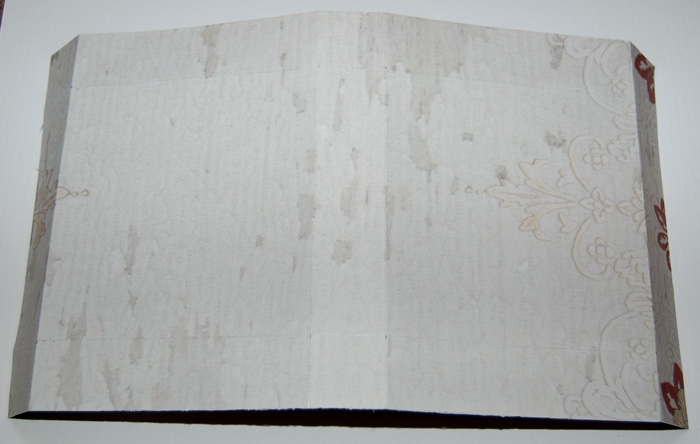
Now you will need to cut into the sides for the flaps
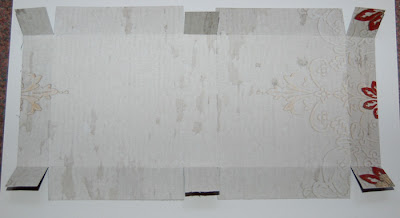
If you want to you can spritz some ink onto the paper before you start adhering the edges together.

Place some double-sided adhesive tape onto the edges of the flaps

The flaps will go inwards and once adhered will create a corner such as this.

And this is how it looks in its more bare stages, before my favourite part -  the embellishing - starts.

First I created a border by cutting three strips from the Spring Sky paper using the Creative Book Pages 2 border die.

I added some scrummy bling lines from Want2Scrap to the sides (which also hides - quite cleverly - the part where the border ends meet)

And here is the box in full frontal and half tilted view.


I hope you enjoyed this tutorial 

Products used
Other products: 
Pens: Uniball Signo in black
Adhesive: Scrapbook Adhesives, KI Gloo

Saturday, 5 November 2011

Handmade Holidays Blog Hop

Welcome to the Handmade Holidays Blog Hop!!!

Calling all crafters! We’ve gathered designers from some of our favourite manufacturers to show you ways to create something from the heart this holiday season. This 3 day Hop includes over 60 stops with inspiration brimming from every corner. Explore all thoughtful and frugal handmade gifts you could make for the holidays, all in one place on this Hop!

To sweeten the Hop, we’re offering a gift for you! For every comment you leave on the blogs in the Hop, you’ll be entered to win a prize pack from one of the participating manufacturer sponsors!

Donna Salazar Design's is giving away this beautiful package:
**Winner MUST be in the US. We are very sorry but international entries can not be accepted for this particular prize due to its weight of the Zutter tool**

Visit the list of blogs below and leave a comment on each by Nov 7, 2011 at 11:59 PM PST. Each day we will be sharing a brand new list of blogs with brand new projects for you to explore, be inspired by, and create from! 

Clearsnap – http://clearsnap.blogspot.com
Spellbinders  http://www.spellbinderspaperarts.com/Community/Blog.aspx
Hampton Art - http://blog.hamptonart.com/
Zutter – http://binditall.blogspot.com/
Graphic45 – http://g45papers.typepad.com/
Donna Salazar Designs – http://donnasalazar.typepad.com/
The Twinery - http://www.thetwineryblog.com/
Authentique Paper http://authentiquepaper.blogspot.com/

Glue Arts - http://gluearts.blogspot.com/
Jan Hennings – Glue Arts http://papercraftpleasures.blogspot.com/
Kim Sonksen – Donna Salazar Designs  - YOU ARE HERE, RIGHT NOW
Jamie Harper – Hampton Art www.jamieharper.typepad.com
Jenny Suchin – The Twinery http://www.suchins.blogspot.com/
Heather Conklin– Authentique Paper  http://goldiecar.blogspot.com/
Gloria Stengel- Graphic 45 http://gloriascraps.blogspot.com/
Christine Emberson - Spellbinders http://hope-chances.blogspot.com/
Julie Overby – Spellbinders http://joverby.blogspot.com/
Mary Dawn Quirindongo – Clearsnap http://mypinkmexico.blogspot.com/
Lea Sanders – Zutter http://leasanders.wordpress.com/
Tara Orr – Graphic45 http://eachmoment-onlyonce.blogspot.com/
Patti Milazzo – Glue Arts -  http://pattimilazzo.blogspot.com/
Emily Lanham – Authentique Paper http://createserendipity.blogspot.com/
Jessy  Christopher – Donna Salazar Designs - www.teacherjessy.blogspot.com

Cheers to creating gifts from the heart this holiday season!
 Happy Hopping

Before you start off on your hop, would you like to see what I have whipped up for ya?

What about this lil’ fella brightening up your home or to be given as a small gift?

You can leave it as is or fill it with some candy, small gifts (maybe a voucher?) or whaterver else you can think of.
So, how did I do it?

First gather a sheet of 12 x 12 double sided paper. It is not essential that both sides have a pattern but you can be so much more creative with it if it does. I chose the “Do You See” paper from Donna Salazar’s 

As I wanted my ball to be fairly small, I decided to cut the paper in half so I was left with two sheets of the size 6 x 12 – for one ball one of these pieces is sufficient.
Now you will need to cut the sheet into individual pieces, making sure that the length of each strip is 6”. The width depends on personal preference and I decided to go with 1” wide paper strips.

I decided that I wanted to showcase both sides of the paper in alternating strips and I wanted to add some wintery-kind of texture to them. First I sprayed them all with Vanilla Smooch Spritz by Clearsnap Inc and sprinkled some white embossing powder randomly into the still wet Smooch Spritz.
The edges were then inked with Cat's Eye Chalk Ink in chestnut roan

 Isn't the effect marvellous? It turned out so much better than I anticipated.

Now you will need to gather your strips and punch a whole on both ends of each strip - I find it easiest when you place them all on top of each other and use the Zutter Hole Punch and Hammer, that way you can be sure that the holes are all in the same area.

Now you can secure the top on bottom with the aid of some Zutter Rivets. They snap together so easy and hold the strips together perfectly.

But how do you get this array of strips into a ball? Well, you will have to fan them out and the easiest way to achieve this is to bend the strips with one hand like this:

With your other hand you will be able to fan out each strip, you can start from the inside out or vice versa and your ball should start to look like so:

Once you have finished arranging the strips you can think about how to decorate the outside of the ball.
I hand-cut a small tag from one of the Artistic Papers of Donna Salazar Designs and stamped it with a holiday image, using various Cat's eye chalk inks. From the "Weathered Mosaics" paper I cut a sentiment mosaic into smaller tag and attached this to the stamped tag


Finally I cut some leaves from the fabulous 8 x 8 Spring In Bloom papers pad of Donna Salazar Designs and added some Fairy Dust Glitter in Sugar Shimmer by Donna Salazar for Clearsnap to the edge for an added "frosty" look.

There you have it - a quick decorative ball, which can be used to house small gifts.
I hope you enjoyed this tutorial and don't forget to leave a comment on all hop stops in order to be in with a chance to win some FABULOUS prizes (just in time for the holidays :)))

Wednesday, 28 September 2011

Donna Salzar Sep II


The below post went live to day on the Donna Salazar Designs Blog with a step-by-step tutorial on how to create this home décor canvas.

** click on any of the images within the post to enlarge/sharpen their view **


I have to admit, I am not really all that comfortable creating home décor projects, I just find it much easier to  get a layout or cards done.
But seeing that we are talking about change this month, I figured I should bite the bullet, put on my big girl panties and get cracking :)

First I took one 6 x 6 blank Canvas Board and started misting it with Smooch Spritz  in Caramel Latte and Pralines and Cream. Usually Smooch Spritz dries incredibly fast but stays wet for a little longer on the canvas. This gave me the great idea to randomly sprinkle some white Top Boss embossing powder on some of the wet areas. I had no idea how it would look once I set it with a heat gun, but the end result was pleasantly surprising.

Next step was to find some papers to add to the background and with the fabulous Antiquities line I was pretty much spoilt for choice. In the end I decided to make use of a piece of scrap from the Time For Tea sheet. I used Donna's All My Love stamp in a very random fashion
(did not even notice I stamped upside down at some stage...what a dork I am!)
and added the Branching Out stamp to the top and bottom edges on the right hand side.
The torn edges were then inked by running Cat's Eye Chalk Ink  in dark brown along them.

I also fussy cut the flower image from the Vintage Gears paper, as this was going to be layered on top of my stamped background.

I adhered both papers onto the canvas with normal wet glue and inked the canvas edges with Chalk Ink in dark brown.

As I am a very dimensional crafter I knew I had  to add some bits and pieces to the left and right of the image, otherwise it would look unfinished to me. But I also wanted to incorporate this wonderful quote, from the Crafty Chronicle:

"Do not follow where the path may lead. Go, instead, where there is no path and leave a trail."
- Emerson

Now this is a quote that I have always lived by and will continue to live by. Over the years I have refused to change the way I am, the way I talk, write and dress just to suit what others may find acceptable. The person I am now I have become by sticking to what I feel comfortable with, by going against the stream if I felt it necessary and more often than not have I started a path where others followed my trail.

So, you see it is always worth just to BE YOU, even if it makes your road in life that little bit  bumpier. In the end you feel such a great sense of achievement and pride that it's worth to lead your own path once in a while.

But I digress, let's go back to the project at hand...

The above quote would undoubtedly get lost on the background of the Canvas, so I traced and hand cut a small tag from one of the Artistic 6 x 6 squares. As the background is plain, they are perfect to be altered with Chalk Inks.
First I started to run a Cat's Eye in dune along the edges and then ran it more and more into the middle to give the tag a slightly aged look.
Then I added some more Chalk Ink in Chestnut Roan and Dark Brown to the edges.

All I need to do to complete my tag was to add a self adhesive enforcement ring, cut the above quote from the Crafty Chronicle and glue onto the tag.

During September Donna Salazar Designs teamed up with the fabulous Want2Scrap - where you can get the most amazing chipboard shapes, bling and pearls. As my tag still needed that little something, I added a few teeny weeny Baby Pearls.

Next I took my new favourite die set, Donna's Alphas, and cut the title for my Canvas  with some Corrugated Board - I LOVE how it gives you a grungy/wooden feel straight away. But I still added some Embossing Powder and Vanilla Shimmer Smooch Spritz and outlined the letter edges with Dark Brown Chalk Ink
Tip: you may have to run the die a few times back and forth over the cardboard to get a good cut. Alternatively you can peel a layer of the cardboard away beforehand, which only requires one run through your die cutting machine.

I outlined the shadow cut of one of the butterflies from the Wonderful Wings die set, added some Smooch Spritz in caramel latte. Its detailed counterpart was then covered in Sugar Shimmer Fairy Dust Glitter before I adhered it to the shadow base.

To add some extra dimension to the Canvas, I decided to hand cut the flower images from another sheet of  Vintage Gears and adhere them to the original cut with some adhesive foam, pads.

Finally I cut the Finesse Swirl from Want2Scrap in two and added the two pieces to the left and the top of the tag. I always feel that cutting swirls into pieces makes them go further on your project and you are not restricted as to where to place them.

And there you have it - a piece of home décor to remind you to BE who YOU are.

Products used
Other products: 
Stickers: Jenni Bowlin
Pens: Uniball Signo in black, Zig Millenium pen in black

Various Trims