Below post went live on the Donna Salazar Blog earlier today.
Today I would like to share a step-by-step tutorial on how to get the best use out of the Crafty Chronicle and Donna's versatile Artistic Papers.
I love creating tags as they are not only a great way to use up those scraps, but they also come in handy when you need a quick card or something to adorn a present and you have no time (or mojo) to get crafty.
Whenever I am not in the mood to create a bigger project, I sit down and dabble in tags. They are then all stored in a little basket on my work desk, so I can grab one quickly whenever I need it.
Now, the Crafty Chronicle and the Artistic Papers are perfect for tags - especially the Chronicle with its plethora of wonderful quotes. For today's tag I have chosen the following:
"If you obey all the rules you miss all the fun"
- Katherine Hepburn
** click on any of the images to enlarge/sharpen their view **


 I used some Smooch Spritz in Cashmere on all circles to give them a more aged look. After they dried I started folding
 and pinching the individual circles
 Some circles I pinched, folded and scrunched more than others in order to get different widths
 With the help of glue dots placed in each middle section, I started to layer
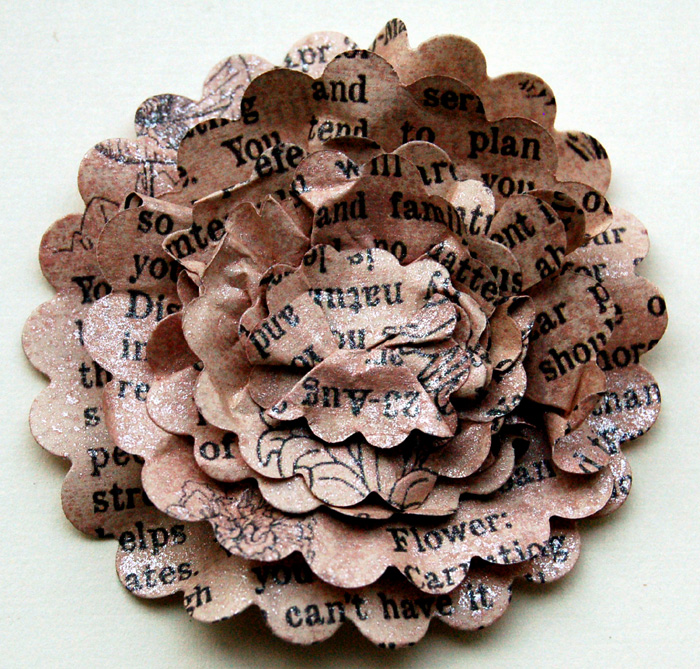
 Can you see the delightful shimmer from the Smooch Spritz on the layers? I love the aged effect the Cashmere colour gives to the Chronicle.
But I was not quite done there and wanted to add bits of interested to a few areas of the layers. With the help of the new Emboss Gloss I was able to get to the exact areas I wanted - it makes life so much easier. The gloss stays wet long enough and allowed me to change my mind about four times as to which colour from Donna's new Embossing Powders I was going to choose. In the end, I opted for Chiffon.
 I LOVE how the embossed areas look like I dipped the scallops in some paint. But there was still something missing, because you just can't have a layered flowers without some Fairy Dust Glitter, eh?
 A self-adhesive pear from Want2Scrap placed in the centre gave the flower a lovely finish.
As soon as this was completed I knew that I wanted to showcase the flower on a tag, so I took a piece of the Artistic Papers, traced along the outline of an old tag and hand cut my own.
 Its colour was too bright for what I had in mind, so I started to distress the background by first blending a generous helping of the new Mixed Media Inx in Honey and Leather over the whole of the tag. A little Smooch Spritz in Wood Stain and Mixed Berries added to the aged look.
 The rest was then a matter of fussy cutting and layering.
Firstly I hand cut the quote I mentioned at the beginning of my post from the Chronicle and adhered it to some black cardstock. Then I hand cut one of the gorgeous butterflies from another sheet of the Artistic papers and adhered it to the tag with foam dots to add some dimension.
 I did not distress or alter the butterfly with any inks or mists as I found the cream and black to work perfectly as a contrast to the layered flower. Had I altered the butterfly I think the tag could have looked a bit wishy-washy.
 When I started with my layered flower I had no idea what my project would end up to be and once I finished the tag, I initially I thought I would stick it on a card. But writing this post and looking at the tag again, I have decided I want to display this on the wall and will be looking for a fitting shadow box.


My starting point for this tag was actually the layered flower, it kind of evolved from there.
I had so many scraps of paper flying around from my Chronicle, which were perfect for a selection of various sizes of the Scalloped Circles die from Spellbinders.


But I was not quite done there and wanted to add bits of interested to a few areas of the layers. With the help of the new Emboss Gloss I was able to get to the exact areas I wanted - it makes life so much easier. The gloss stays wet long enough and allowed me to change my mind about four times as to which colour from Donna's new Embossing Powders I was going to choose. In the end, I opted for Chiffon.


As soon as this was completed I knew that I wanted to showcase the flower on a tag, so I took a piece of the Artistic Papers, traced along the outline of an old tag and hand cut my own.


Firstly I hand cut the quote I mentioned at the beginning of my post from the Chronicle and adhered it to some black cardstock. Then I hand cut one of the gorgeous butterflies from another sheet of the Artistic papers and adhered it to the tag with foam dots to add some dimension.


Products used
- Papers: Donna Salazar for GCD Studios - Spring Journal Cards - Spring in Bloom, Crafty Chronicle, Calendar, Spring in Bloom - Artistic Papers
- Mists: Donna Salazar for Clearsnap - Smooch Spritz in Wood Stain, Holly Berries, Cashmere
- Inks: Clearsnap Mixed Media Inx - Honey, Leather
- Embossing: Powder and Gloss Donna Salazar for Clearsnap
- Glitter: Donna Salazar for Clearsnap - Fairy Dust Glitter in Pralines and Cream
- Tools: Zutter - Distrezz-it-All
- Dies: Spellbinders - Scalloped Circles LG, Creative Bookpages Two,
- Pearls: Want2Scrap
Pens: Zig Millenium pen in black
Adhesive: Helmar, Scrapbook Adhesives
Other: Embroidery Floss, Self-adhesive washer