Showing posts with label Spellbinders. Show all posts

Sunday, 8 July 2012

She scrapped, she did!

I almost can't believe it....I scrapped again - after a seven month break!
As soon as I finished my greeting card the other day I had to get stuck in and create a layout, just to see if the creative spark is still there.

First I started with the textures and after die cutting my title from some corrugated cardboard, I distressed the letters with ink and mists. Oh, the joy to get my fingers all sticky and grungy again :)

Needless to say I simply had to have one of my beloved butterflies plonked somewhere on the layout, right?
My black outlining still worked a treat as well which gave the die cut some added dimension.

The layout itself was created for the recent {Donna Salazar Girlie Grunge Challenge} and was also inspired by the sketch of DT member Mistra. My non-scrapbook items are the bits of punchinella tucked underneath the paper and bits cut from my English dictionary (you can see one line with the explanation of the word "rejoice" to the right of the butterfly)

Of all my old scrapbook supplies I kept all my Donna Salazar stuff because I am still a massive fan of her and her products - pretty much everything else had been given away but not Donna's products, no siree.

So, you wanna see the complete layout?
It is not 100% up to the standard I would like it to be, but I am nevertheless pleased with how it turned out.

**click on image to enlarge the view**
Materials used:
Papers: Donna Salazar for GCD Studios
Cardboard: Donna Salazar for Zutter
Inks/Mist: Donna Salazar for Clearsnap Inc
Die Cuts: Donna Salazar for Spellbinders

Monday, 13 February 2012

Donna Salazar - February DT - Pt I

Good morning all, this is Kim S. to post for Donna Salazar Designs showcasing a card made with Donna's awesome stamps, produced by Art Gone Wild

First I prepared the background by spritzing a piece of manilla paper from the new Mixed Media Stax pad with Smooch in Cashmere and Holly Berries.
Once it dried I randomly stamped the branch motif in two different colours along one corner and finished it off by embossing two branch motifs in white.

Previously I stamped the Queen Bee motif twice onto a scrap piece of the manilla paper with Mixed Media Inx, hand cut the images and added some glitter to their wings.

With the aid of adhesive foam squares, I raised the bees from the background and added the sentiment using Donna's Alphas and Jenni Bowlin stickers.


Products used

Saturday, 11 February 2012

Gel-a-Tins February DT - Pt II


Sweet Girl- Card


Hello everyone, today I have another CAS card for you and to go with the baby card for a boy from last week, here is one for a sweet baby girl


Making use of the PEACE ON EARTH stamp set I started by stamping a set a baby feet onto the cardbase.


A handcut sentiment was added on top of the feet with some pop dots for dimension and a few pearls added.
As just the stamp and sentiment looked so lost on the card, I added a layered butterfly die to create a balance.


Supplies used:
Cardstock - Papermill
Sentiment - Bella Blvd
Ink - Donna Salazar Mixed Media Inx for Clearsnap
Butterfly Die - Donna Salazar for Spellbinders
Pearls - unknown

Friday, 13 January 2012

Donna Salazar DT - January Pt I


Below post went live earlier on the Donna Salazar Blog.

Did you know that you can create a minibook from scratch with your favourite Donna Salazar papers and Spellbinder dies? Yup – all you need is paper, dies and embellishments.

You can also die-cut your paper in such a way that you can “bind” your minibook by sewing or stapling the spine.

First you will need to decide on the size of your minibook, I opted for a 6x6” book and first cut a sheet of  the Antiquities Theatre paper in half
Now you want to fold the sheet over like this
If you wish for you paper to remain in one piece, you will have to place it onto your chosen die ensuring that the fold does not cover the cutting edge.
If you are worried that the paper may slide a little during the cutting process, you may want to keep it in place by adding a little masking tape over paper and die.

For my book, I decided on three double pages, which I cut using the Creative Book Pages, Creative Book Pages 2 and Grand Labels One dies for which I cut a sheet of Spring in Bloom - Pretty in Purple to an initial 6 x 6 size.
I cut various shapes from a selection of Spellbinders dies and arranged them in a layered fashion on the individual pages.
Additionally I also used the Wonderful Wings dies as stencils placing them onto one of my double pages and spraying over them with various coloured mists, outlining the white spaces when I removed the dies. You can create your won patterned papers like this!
Now you want to “bind” your book and you can either do this by piercing a few holes in the spine of your collected folds and thread some twine or floss through it, or you can use a stapler, as I did:
I started my book by finishing off the cover first – adding the title cut with Donna’s Alpha out of corrugated board and heat embossed. The final touch is the gorgeous butterfly using the Wonderful Wings die and adding a little sparkle with pearls and rhinestones.
I leave you with pictures of the individual pages and hope that you enjoyed today's step by step

 Products used:
Spellbinders
GCD Studios:
Donna Salazar's Spring in Bloom - Spring Sky, In Bloom,
Donna Salazar's Antiquities - Harmony, Let's Ride, Theatre, Time for Tea
Donna Salazar's Crafty Chronicle
Want 2 Scrap:
Baby Pearls in white, Bling Strips in white/silver
Clearsnap Inc:
Donna Salazar's Smooch Spritz in Tea Party, Wood Stain, Green Olive
Top Boss Embossing Powder in White
Chalk Ink in Chestnut Roan
Zutter:
Corrugated Cardboard


Other Supplies: Jenni Bowlin Alpha Stickers, Bella Blvd phrase papers

Tuesday, 13 December 2011

Donna Salazar - December DT Pt I


Below post went live on the Donna Salazar Blog earlier today.

Today I would like to share a step-by-step tutorial on how to get the best use out of the Crafty Chronicle and Donna's versatile Artistic Papers.

I love creating tags as they are not only a great way to use up those scraps, but they also come in handy when you need a quick card or something to adorn a present and you have no time (or mojo) to get crafty.
Whenever I am not in the mood to create a bigger project, I sit down and dabble in tags. They are then all stored in a little basket on my work desk, so I can grab one quickly whenever I need it.

Now, the Crafty Chronicle and the Artistic Papers are perfect for tags - especially the Chronicle with its plethora of wonderful quotes. For today's tag I have chosen the following:
"If you obey all the rules you miss all the fun"
- Katherine Hepburn

** click on any of the images to enlarge/sharpen their view **
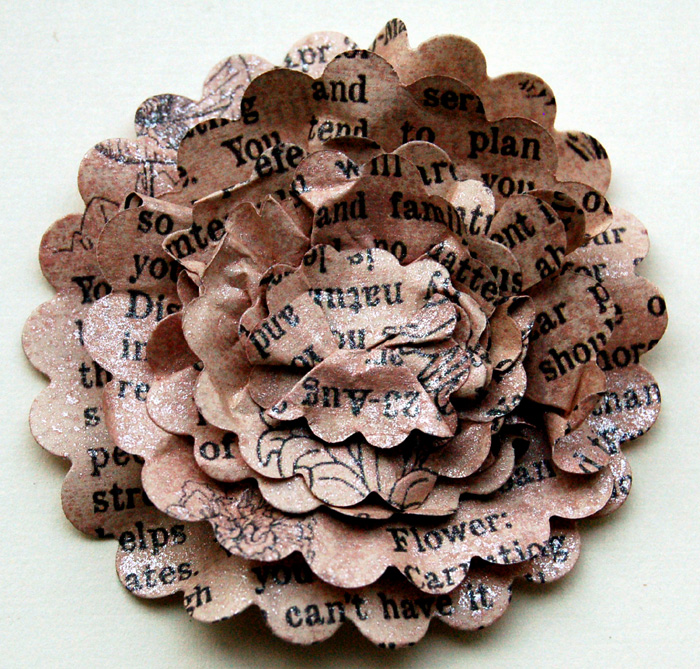
My starting point for this tag was actually the layered flower, it kind of evolved from there.
I had so many scraps of paper flying around from my Chronicle,  which were perfect for a selection of various sizes of the Scalloped Circles die from Spellbinders.
I used some Smooch Spritz in Cashmere on all circles to give them a more aged look. After they dried I started folding
and pinching the individual circles
Some circles I pinched, folded and scrunched more than others in order to get different widths
With the help of glue dots placed in each middle section, I started to layer
Can you see the delightful shimmer from the Smooch Spritz on the layers? I love the aged effect the Cashmere colour gives to the Chronicle.

But I was not quite done there and wanted to add  bits of interested to a few areas of the layers. With the help of the new Emboss Gloss I was able to get to the exact areas I wanted - it makes life so much easier. The gloss stays wet long enough and allowed me to change my mind about four times as to which colour from Donna's new Embossing Powders I was going to choose. In the end, I opted for Chiffon.
I LOVE how the embossed areas look like I dipped the scallops in some paint. But there was still something missing, because you just can't have a layered flowers without some Fairy Dust Glitter, eh?
A self-adhesive pear from Want2Scrap placed in the centre gave the flower a lovely finish.
As soon as this was completed I knew that I wanted to showcase the flower on a tag, so I took a piece of the Artistic Papers, traced along the outline of an old tag and hand cut my own.
Its colour was too bright for what I had in mind, so I started to distress the background by first blending a generous helping of the new Mixed Media Inx in Honey and Leather over the whole of the tag. A little Smooch Spritz in Wood Stain and Mixed Berries added to the aged look.
The rest was then a matter of fussy cutting and layering.
Firstly I hand cut the quote I mentioned at the beginning of my post from the Chronicle and adhered it to some black cardstock. Then I hand cut one of the gorgeous butterflies from another sheet of the Artistic papers and adhered it to the tag with foam dots to add some dimension.
I did not distress or alter the butterfly with any inks or mists as I found the cream and black to work perfectly as a contrast to the layered flower. Had I altered the butterfly I think the tag could have looked a bit wishy-washy.
When I started with my layered flower I had no idea what my project would end up to be and once I finished the tag, I initially I thought I would stick it on a card. But writing this post and looking at the tag again, I have decided I want to display this on the wall and will be looking for a fitting shadow box.

Products used
Other products
Pens: Zig Millenium pen in black
Adhesive: Helmar, Scrapbook Adhesives
Other: Embroidery Floss, Self-adhesive washer


Monday, 28 November 2011

Donna Salazar Nov II

Below post went live on the Donna Salazar Design Blog earlier today, with a step-by-step tutorial on how to make you average tissue paper box look like a luxury item. And if you are still on the look for an easy Christmas present, this would definitely fit the bill.


I have tissue boxes all over the place, in my craft room on my desk in the office and on my bedside table, but they do look cheap. So, dressing up your tissue box to work with the colour scheme of specific rooms is really rewarding. And the good thing is that you can re-use the cover.

** click on any of the images to enlarge/sharpen their view **
tutorial first seen on: Splitcoaster Stampers


First you will need to measure the sides of your box, which are generally square but of course mine had to have different sizes sides...Total width of my box came to 21cm's plus I added a further 1cm for a fold-over strip. If you want your cover fit tightly over your box, you will need to stick closely to the original measurements, but if you prefer it to be a little loose, just add a millimetre or two to each measurement.
You will need to pieces of paper of the same size:
Mark with pencil where you will need to score for the width of  each side, for my example I scored at 10 cm, 11cm and 1cm. On the 1cm strip you want to place double-sided adhesive along the length and join this with the back of the longer side:
I previously inked all edges before joining the two parts, but this is not necessary - it can easily be done after you have joined the sides:
At this stage I would try if the cover fits you box to enable you to make alterations if needed.

You will then need to measure the top of the box and cut out a square, adding at least 1cm on each side (this is depending on your preference) and score accordingly
You will need to measure now where your opening should go and marks this on the inside of the lid. To be honest, I eye-balled where I wanted to cut the oval.
You can use any shape or form for the opening, for example Spellbinder's Classic Ovals SM.
Now you will need to turn your top cover into a proper lid by adding corner. I know that some people like to cut the corners but I prefer to score them diagonally and pinch them inwards. You will need to glue the pinched section together and afterwards to the side.
At this stage I would try again of the lid fits snugly on top of your tissue box cover.
Perfect!
You can either glue the lid onto the cover or just leave it as is - as long as you do not adhere it to the original tissue box, you will be able to pull the cover off once the tissues are gone and decorate your next box with it.
Now, we come to the best part - embellishing :)
First I cut for strips using the border die from Spellbinder's Creative Book Pages Two and adhered them to the sides of the lid. I further embellished the border with self adhesive pearls from Want2Scrap.
Of course, I could not help adding a few butterflies along the way, using Spellbinder's Wonderful Wings dies from Donna's collections.

So, there you go a fantastic way to dress up your tissue box, either for yourself or made as a gift.
I am lso entering this into the fantastic linking party over at Passionately Artistic

Products used
Other products
Pens: Zig Millenium pen in black
Adhesive: Helmar, Scrapbook Adhesives