Saturday 30 July 2011

Being crafty...and a Giveaway

The last few days I have revelled in being miserable - I tell you (and Mr P will certainly vouch for that),
I can do miserable better than anyone :))))

Despite my healthy living lifestyle, I have piled on the pounds like no ones business and naturally that started my "woe-is-me" misery. Add to that man-flu (I don't do common colds, when I get the sniffles I turn into a whining mess, just like a dude) and to top it all off, after a sleepless night I was greeted with a migraine of the evil kind yesterday. It took me a good 12 hours to get it under control, with prescribed medication, a lot of bed rest and fluids. So, this morning I could not wait to get out of bed and start being positive again.

Ms Migraine, tentatively made herself known to me when I got up, but one pill later and she's put back into her box. I can always tell that I have her under control when I go on the computer and after an hour of starting at the screen I am neither feeling sick or headachy - result on that front :))

So, with that one ticked off, I decided to turn my man-flu into a common cold and all of a sudden life doesn't look so bad. The added love-rings, well I have to tackle them another day. For now I just want to create.

Recently I have missed being subbed to a monthly paper crafting kit and to tell you the truth, most of them out there are neither here nor there. They either have too many embellishments, too much cardstock, too much product of just one manufacturer....I don't know, maybe I am hard to please (insert heavy nodding from Mr P)

But now I am sure I have found the Kit that is perfect for me - and what is even better, you can start a subscription with the smaller version and this is only £10.00 including postage to the UK. Enter Quirky Kits Lite.

I found that the amount of papers, cardstock and embellishments in this kit are just perfect for me - but if you would like a little more of each, then you can subscribe to the full Kit for only £22.00 including postage in the UK.

These kits are available every two months which makes it even better value in my eyes, either £5.00 or £11.00 set aside each month - for the scrapper on a budget definitely worthwhile.

Anyway, I got my first kit yesterday and could not wait to get started - and the frugal scrapper in me, made sure that even made use of the packaging...but more of that later.
Let's have a look at the first layout I made with it.

**click on any of the images to enlarge/sharpen the view**


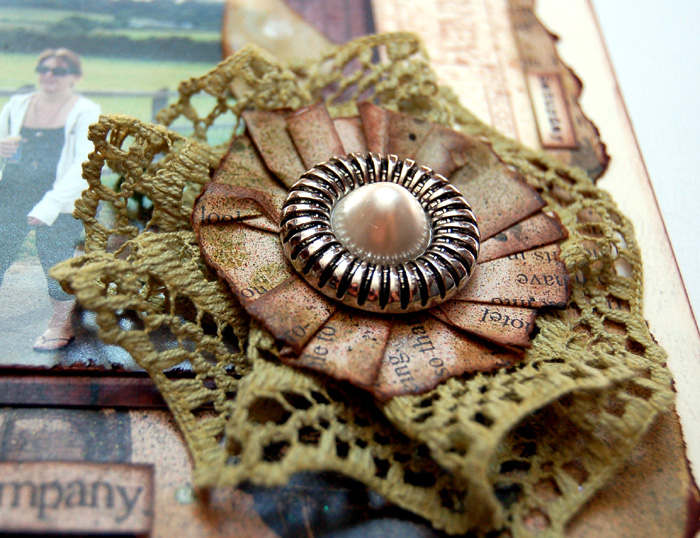
See that big flower?
That was created by hand cutting four different sized circles from the tissue paper in which the kit was wrapped. A little spritz of Cosmic Shimmer, a little crunch, layer them on top of each other
(with a dot of glue in between layers) and glue a flat backed pearl in the middle - eh voila:

And then there was a little note from Quirky Kit owner, Leonora about the subscription but I loved the kraft paper so much that I simply flipped it over, ran a Fiskars border punch along the edge and it tucked behind the picture

But that was not the end of my frugal adventure...oh no. You see, Leonora uses different pieces of washi tape to pack up the kits - and there was no way I was going to throw that super cute heart washi and the polka dot washi away. I simply peeled it off the packaging and stuck it in my layout.


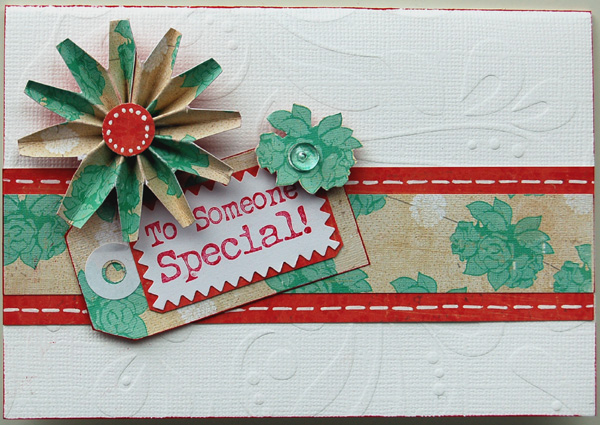
And while I was in a creative mood, I razzled up a card for the recent challenge over at the Some Odd Girl Blog:


As for the giveaway - well it is not from me, but my super talented friend Nathalie. Look what you can call yours with a little luck:
Nat has just "move" virtual home and if you check out this post you can get the skinny on how you can be in with a chance to win that package above.
Good luck!


Thursday 28 July 2011

Donkey Sanctuary

It is my turn again to post for Donna Salazar Designs with a step-by-step tutorial on what happens when I let my creative juices take control of pretty papers, inks and glue...

**click on picture to enlarge (which incidentally also sharpens the image} **


This month we focussed on  the fabulous Crafty Chronicle, which I adore so much that I can hardly bring myself to cut it up and use it, but alas this month I had to bite the bullet :)
The travel section of the Chronicle is definitely my favourite, the vintage images and quotes just make me happy. It was clear to me right from the start that I wanted to make use of a complete page of the Chronicle to use as my layout base.

First, I used a variety of Smooch Spritz in Tea Party, Wood Stain and Caramel Latte to spritz gently over the paper. To add some more texture, I used a Crafter's Workshop Stencil template and brushed over it with some gesso. Once the gesso dried I adhered a little strip of punchinella, with the help of some masking tape, to the paper. Masking tape will lift off the background without damaging your paper or previously stamped/stencilled paint.

For the smaller circles of the punchinella, I decided to use the Smooch paint from Clearsnap as it has a wonderful small brush already attached and helps to paint smaller areas. I actually don't mind that some of the paint smudged between the circles - I love my paints to get messy :)


Finally I lathered a sheet of bubble wrap with some Smooch Spritz in Green Olive and Caramel Latte and pressed this on the opposite side of the page.


All I needed to do now was tear of strips of paper along the edges to fit an 8.5 x 11 page and ink the edges with Clearsnap's Cats Eyes Chalk Ink in Dark Moss, Chestnut Roan and Dark Brown. Take a sheet of the wonderful Artistic Papers (in this case I used the calendar one), flip it over and cut it to 8.5 x 11 size, as this will be your piece of cardstock, to back the Chronicle paper.

From tearing the paper to size, I had a few strips left over and one was big enough to "rescue" and create a flower from it.

Just fold in a concertina style as described HERE and press it down. This time I wanted to achieve a flattened look and so I simply pressed hard onto the top f the rosette, inked the edges with Cats Eye Chalk Ink in Chestnut Roan and fastened the rosette with a glue dot to a piece of cardstock. I still wanted to add a little extra and attached an older piece of lace to the back of the flower with the help of my stapler.


Now I just added one of the gorgeous Vintage Buttons I got from Donna's Etsy shop years ago and my flower was ready to go.

I finally added some bits and pieces of left over strips of paper (usually the scraps when I cut the 12 x 12 sheets to my preferred size of 8.5 x 11), attached the flower and one of the fabulous quotes from the Chronicle.

Products used
Other products
Stickers: Jillybean,Pens - Uniball Signo in white
Lace- Rusty Pickle
Stamp - 7Gypsies,Bubblewrap
Stencil - Crafter's Workshop, Punchinella

Wednesday 27 July 2011

Twisted Sketches #112


Well who would have thought - today is my last post as a Twisted Sister, those six months went quicker than a I would have thought.

It has been an amazing time working with Anam and the rest of the team and I cannot wait to see what the new team will create.

So, here is my last sketch, with the twist "fun".
Come join us over at Twisted Sketches

**click on image to enlarge **
Papers, Stickers: Sassafras Lass
Alpha Stickers: Rusty Pickle
Other: Paint, Alphabeads

Monday 25 July 2011

Crochet: WIP

Currently I am working on this baby


I am TOTALLY and UTTERLY into this colour combination, which happened rather by accident.

Any suggestions as to what it may turn into?


Friday 22 July 2011

Big News...

..well not for me - but for my colleague Ann - who celebrates her *****tieth birthday at the end of the month. She really likes colourful cards, so I figured this lil' monkey would be right up her ally.

**click on any of the images to enlarge the view **

I paper pieced the hat and jacket and adhered it to this wicked image from DUSTIN PIKE with some adhesive foam dots. Totally dig how this one turned out, so I am entering it into the current DP CHALLENGE
Cardstock: Stampin' Up ** Papers: Crate, My Minds Eye, Lily Bee Designs** Stamps: Flying Monkey by Dustin Pike, Flourish by Hero Arts ** Pens:  ProMarkers, Uniball Signo in white

Thursday 21 July 2011

Papermaze DT - July PT III


Below is a post I recently shared on the PAPERMAZE BLOG - I hope you enjoy

What do you do with your paper scraps?
I used to collect them in a box, promising myself that I would use them eventually....yeah, right. I found myself drowning in scraps and ended up throwing boxes of them away.

These days I challenge myself to create a card and/or tag as soon as I finished a project with some of the left over scraps. Right now I am totally addicted to make tags, because you have the best of both worlds with them - either use them to adorn a gift or stick them on a blank card and you have a quick greeting card when you need it.

Here are two examples I created from a few left overs.

** click on images to enlarge their view **

CardstockBazzill
Papers: Crate Paper - Portrait "Something Blue"
Beads: Dew Drops "Clear"
Pen:Uniball Signo "White"
Ink: Staz On "Blazing Red"

CardstockBazzill
Papers: Crate Paper - Emma's Shoppe "Sweets""Quilts"; The Girl's Paperie "Birds of a Feather"
Stickers: Jenni Bowlin - Black Tiny Dot
Mists: Cosmic Shimmer - Aqua LagoonAncient Copper; Tattered Angels - Olive Vine
PunchesWoodware


****Edit:****
In answer to Monica's question in the below comments,  I really don't remember how I created that flower. I think I just folded a piece of paper strip in concertina fashion and cut into the edges...I am kicking myself now that I did not take any notes of how what I did.
Better be prepared next time, right?

Wednesday 20 July 2011

Crochet YAY - The Chevron

Finally I have been able to get a few pictures of my finished chevron blanket.


As I said here, the blanket was done so quickly - it took me only ten days (i.e. evenings in front of the telly) to create this super soft and super yummy comfort blanket.

Yarn
Stylecraft Special DK in #1390 Clematis (200g), #1080 Pale Rose (200g), #1067 Grape (200g), #1130 Candy Floss (200g), #1023 Raspberry (100g), #1061 Pulm (100g)
Hook: 4.0mm

I am so going to make another one of these, because they are so easy to do and they look and feel great


Monday 18 July 2011

Papermaze DT - July PT III

Hello everyone, it is my turn again over at the Papermaze Blog  with another layout using the Basic Grey Lauderdale collection.

**click on the picture to enlarge - this will also sharpen the image **

There are some papers within this collection, which I found at first glance a little overwhelming such as the Beach Towel. I usually shy away from papers with stripes, as I have no idea how best to use them.


But as Basic Grey is double sided, I simply focused on the flip page, which has a nice hue of blues and some cool retro rectangles. I quickly decided that I wanted to create a page that somehow involves water/sea and the picture of my Mum taken on her first ever voyage on board Queen Mary 2 just screamed to be used :)

First off I wanted to tone the blue down a little, so I added some Gesso with the help of a few stencils and finally added Cosmic shimmer in Blue Ice to create the base of my background.

I hand cut a few flowers from the Coastline paper and layered them around the edges of the photograph. The picture itself was matted with some more of the fantastic Lauderdale - Element Stickers.

Products used:
Papers - Basic Grey: Lauderdale collection
Stickers - Basic Grey; Jenni Bowlin
Mist - Cosmic Shimmer
Pearls - Mark Richards


Sunday 17 July 2011

Summer Fun

It was about time that I participated in one of the Sassafras Lass Blog challenges again and this month was perfect for me. Not only did I have quite some time on my hands but I loved the requirement to mix and match the Sass lines.

Now you know me, I am a mixer and matcher at heart - there is nothing I love more than to bring all those different lines together. To me that showcases a great manufacturer too, if you can mix and match their lines effortlessly.

So, here it is my Sass-Mix of Amplify, Monstrosity, Apple Jack and an older line of which the name escapes me - could it be robotics or something like that? Anyway, this is the result - I am loving it!

**click on image to enlarge**

Would you believe me if I said that I think right now Sassafras Lass has overtaken My Minds Eye as being my Number one manufacturer? Yup, it is true - after six years of devoted love and affection I have gone off MME big time and tend to use Sass as my "go-to" manufacturer. Weird, hu?

By chance I have come across this cute Stamp Manufacturer PAPER SMOOCHES and when I saw that they are looking for a Guest Designer for August, I just had to throw my hat in the ring, because their images are TOO cute for words....you have to check 'em out.

Here's what I razzled up

** click on the images to enlarge **


Saturday 16 July 2011

Home and Away.....

...that is the title of Mr P's and my daily soap. I have been an addict follower of HOME + AWAY since I moved to the UK (waaaaaaaaaaaaaaay back when...). Mr P has been an addict even longer than that and when he was in Oz back in 1996, he simply had to have is picture taken overlooking "Summer Bay", the fictional seaside town of the soap.

I found that the background cardstock I created HERE was prefect for the picture and to top it all off, it also works for the second challenge over at KASSETTENKINDER, where the requirements ask for the use of the colours blue, green and yellow.

** click on image to enlarge **
Cardstock - Poundshop ** Papers, Stickers - American Crafts ** Mist - Cosmic Shimmer ** Chalk Ink - Clearsnap Inc ** Deco Tape - Pink Paislee ** Brad - Upsy Daisy Designs ** Tools - Bubble Wrap, Sequin Waste ** Other - Embroidery Floss, Pearls, Rhinestones, Australian Postage Stamp, Flowers

See the flower at the top left corner? I misted the blossom layers with different colours of Cosmic Shimmer, so that they would fit in, neat hu? I know that this is old news but I never did it before....I am SO behind the times. But as of now, only white flowers and trims will make it into my stash so I can dye them with mists and inks to suit my needs.

Lately I have been extremely blessed to have had oodles of my work been picked up for publication - amazing, really that right now almost everything I submit gets picked.
Recently I have had a gift container published in Ready, Set, Create - a layout in Scrapstreet and my most treasured - a double pager in Cards! Just look at how wonderful the card was displayed by the mag

And right now, I have another card and project in he pipeline for Ready, Set, Create and a layout to appear in Scrapbook News & Reviews this weekend.
 I am so thankful and feel very blessed indeed.

Friday 15 July 2011

Upsy Daisy Designs - DT July PT II


For my second DT assignment for Upsy Daisy Designs this month I decided that I could do with a set of cards - we all need cards at some stage, right?

Recently I have been struggling so much with cards but these two came together so quickly -  within a total of 10 minutes.

Gratitude:
Cardstock - Papermill
Papers - Upsy Daisy Designs: #UDD0128. Sing-Song,  #AVA016. Wipeout 
Rub Ons: Upsy Daisy Designs: #UDD191. With Gratitude
Buttom: My Little Bit Of Whimsey

Thank You:
Cardstock - Papermill
Papers - Upsy Daisy Designs: #AVA015. Summit#ED015. Regal
Rub Ons - Upsy Daisy Designs: #UDD191. With Gratitude

Thursday 14 July 2011

Cards galore...

...man, I can't believe that all of a sudden I am making cards again. 

Somehow I totally lost the ability to produce anything that I was remotely happy with - we even B.O.U.G.H.T. (as in went to the shop and paid for it) cards when we needed some. I know - shocking, right?

I pretty much resigned to the fact that my days as a cardmaker were over but then I looked at my gazillions of ProMarkers yesterday. There was no way I could give up after having spent a small fortune on those dang pens, so I started to print out some digi images from KENNY K and DUSTIN PIKE

It would be great if I could say that as soon as I had the pens in my hands it all came back to me....but it wasn't so. My first attempts at colouring looked worse than what a two year old could do. I was getting even more annoyed now and contemplated just putting all the markers up for sale.
Something made me pick up the pens again and continue to work with the images and all of a sudden it was back - card making mojo woke up and saw me creating up a storm of six cards within the matter of a few hours.

I got so excited that I quickly checked all the card making blogs again to see if there would be any challenges which I could enter...and thankfully there were a few. 
So let's link those cards up...Are you ready?

** click on any of the images to enlarge their view **

- It's In The Stars -
Digital Stamp: Some Odd Girl ** PensProMarkers, Uniball Signo, Zig Millenium ** Mists: Cosmic Shimmer ** Alcohol Inks: Ranger ** Chipboard: Rusty Pickle

Fun Tip: I created the background by placing various chipboard stars randomly onto card stock and sprayed over it with Cosmic Shimmer. Additionally I dropped some Alcohol Inks here and there. Splashes and start were outline with a black pen to make them stand out more.

- Hot! Hot! Hot! -
Digital Stamp: KennyK Downloads ** Sentiment Stamp: Stampin' Up ** Papers: American Crafts ** PensProMarkers, Uniball Signo, Zig Millenium ** Ink: Chalk Ink by Clearsnap Inc ** Cardstock: Bazzill

Fun Tip: The background on the cardstock was created by dabbing a chalk ink pad over some punchinella

- Gingham -
Digital Stamp: Dustin Pike ** Sentiment Stamp: Stampin' Up ** Papers: American Crafts ** Pens: ProMarkers, Uniball Signo, Zig Millenium ** Ink: Chalk Ink by Clearsnap Inc
Fun Tip: The background on the cardstock was created by dabbing a chalk ink pad over some punchinella

- Get Well Soon-
Digital Stamp: Dustin Pike ** Papers: American Crafts ** Cardstock: Poundshop ** Pens: ProMarkers ** Mists: Cosmic Shimmer

There were two more cards I created but they are for a DT assignment for October, so I cannot share yet (even though I am BURSTING, because I thought that those two were my best cards out of this lot)

Thanks for looking and thanks to Card-Mojo for coming to back to me!

Wednesday 13 July 2011

The Big Bash

Today I would like to share a layout created with a combination of papers used from The Crafty Chronicle, Antiquities and Spring in Bloom. Donna's paperlines mix and match so well that combining them in one project is so much fun!

This month we embrace independence and artistic expression, something Donna teaches with passion and inspiration and hopefully some of her talent may rub off on me during my term as one of her DT members.

I love getting messy and work with different techniques and textures, so the starting point for my layout was the background. Using a stamp inked with the Watermark Inkpad from Clearsnap, I sprinkled some of the white Top Boss Embossing Powder onto the stamped area, tapped off the surplus powder and used my heat gun to set the embossed area.

After the embossing powder was dry to the touch, I sprayed a combination of Smooch Spritz in Mixed Berries and Caramel Latte over the whole background. Once this dried I used a damp cloth to remove the mist from the embossed area to enhance the whiteness of the lines - it really makes them stand out from the light background.

I also love colouring areas with the help of markers, and Donna's  Artistic Papers for each of her collections, are perfect to let your creative juices flow.

For my layout I chose the Spring in Bloom 6x6 paper and after colouring two of the images, I carefully cut them out individually, added a generous helping of Fairy Dust Glitter in Pralines & Cream and Mixed Berries and adhered them to the background with the aid of adhesive foam squares.

All I needed to complete the layout was to ink the edges of the papers with some Fluid Chalk Ink in Chestnut Roan, after I worked on some edges with the help of a distressing tool such as the Distrezz-it-All.

** click on image to enlarge ** 


This layout was also inspired by this week's sketch #110 over at {{Twisted Sketches}} with the added twist of "Ribbon"

Products used
Other products
Border Punch - Fiskars
Cardstock - Poundland
Pens - Uniball Signo in white, Zig Millenium in black

Stickers - Making Memories, Rusty Pickle
Lace - unknown

Sunday 10 July 2011

A Discovery....

....today, I found out that if you take this lot


of bubble wrap, cosmic shimmer, oil pastels and inscribe pastels you can create the most stunning background paper for a crafting project.

First, you spray onto the bubble wrap with your chosen colours of cosmic shimmer and then press it onto a piece of white cardstock. The resistant surface of the bubble warp will ensure that your colours mix and delightfully squash and squish around under the pressure you apply.

Once this has dried, I dabbed a few strokes with the inscribe pastels along the edges of the cardstock and started to rub the colours in with my fingers (very messy but OH so worth it). To finish it off, I ran a darker coloured oil pastel along the edges and rubbed this into the background too - what a fantastic effect this gave.

When working with pastels you have to make sure to use a spray fixative in the end, otherwise the particles can come off your background and stain you, your fingers, your clothes, etc etc

I am so darn pleased with my discovery that I will create a few more backgrounds in other colours and with other textures and mediums.

Have you checked out PASSIONATELY ARTISTIC lately? Well, I think you should as there is OODLES of fabulous talent out there!