Wednesday, 30 November 2011

WIP's and a FROG

I have so many WIP's at the moment, it's not even funny...but I still keep adding more!

Currently I have packed away one WIP for a white/cream cowl (haven't taken a picture yet though) as I ran out of yarn and am awaiting delivery, so I can carry on - so naturally that meant I had to start on something else, right?

Well - can you guess what these fella's will turn into?

But there is more, oh yes and you are not going to believe your eyes....

Yup, you see that right - I.Am.Knitting.
I know, I kinda shocked myself when I decided to give it another go.
So far it's looking good and hopefully it will fit me in the end.

Recently I ended up frogging almost every project I did - like the yarn I am using for the knitted jumper above - I spent two weeks crocheting a lovely lace vest, only to wear it once and finding it extremely uncomfortable.
It looked fabulous on the hanger but the 100% cotton wool made it too heavy and too stiff, so it was very awkward to wear. But the jumper should be ok (fingers and toes crossed).

And I also  frogged this scarf (was too wide and too long)

I had the idea to make a lap blanket from the yarns and ended up with about 120 squares to be joined

Guess what..
Yah, I frogged them shortly after. 
Somehow the blanket did not come together in the way I expected it.

Mr P said to me the other day "I think you mainly enjoy the process of making things but don't care too much for the end product. You love unravelling and starting again"

I think, he has a point - I am always sad when I come to the end of a project and when I am not 100% happy with it, I start again.


Tuesday, 29 November 2011

Papermaze DT - November PT I

The below post went live on the Papermaze blog earlier:

This month I have been playing with Bo Bunny's Et Cetera and Simple Stories' Life Documented lines and they are just so perfectly combinable with each other, it's almost spooky!

I started off with an 8.5 x 11 sheet of white cardstock and gave it an aged look by spritzing some "home-made" walnut spray onto it. If you have an empty spray bottle and one of the Distress Ink Reinkers from Ranger Industries, just add some water and a few drops of the reinker to your empty bottle and you have a perfect walnut spray.

I then cut a few pieces of paper from Bo Bunny's Et Cetera Cut Outs and Symphony, as well as Simple Stories' Life Documented and layered this randomly onto the cardstock.
The final touch was a piece of trim onto which I added a sentiment using adhesive foam pads.

And there you have it - a mixed manufacturer layout


Monday, 28 November 2011

Donna Salazar Nov II

Below post went live on the Donna Salazar Design Blog earlier today, with a step-by-step tutorial on how to make you average tissue paper box look like a luxury item. And if you are still on the look for an easy Christmas present, this would definitely fit the bill.


I have tissue boxes all over the place, in my craft room on my desk in the office and on my bedside table, but they do look cheap. So, dressing up your tissue box to work with the colour scheme of specific rooms is really rewarding. And the good thing is that you can re-use the cover.

** click on any of the images to enlarge/sharpen their view **
tutorial first seen on: Splitcoaster Stampers


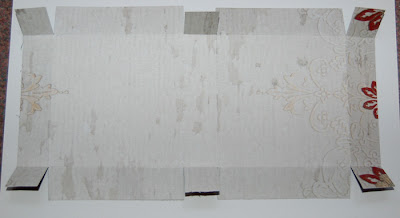
First you will need to measure the sides of your box, which are generally square but of course mine had to have different sizes sides...Total width of my box came to 21cm's plus I added a further 1cm for a fold-over strip. If you want your cover fit tightly over your box, you will need to stick closely to the original measurements, but if you prefer it to be a little loose, just add a millimetre or two to each measurement.
You will need to pieces of paper of the same size:
Mark with pencil where you will need to score for the width of  each side, for my example I scored at 10 cm, 11cm and 1cm. On the 1cm strip you want to place double-sided adhesive along the length and join this with the back of the longer side:
I previously inked all edges before joining the two parts, but this is not necessary - it can easily be done after you have joined the sides:
At this stage I would try if the cover fits you box to enable you to make alterations if needed.

You will then need to measure the top of the box and cut out a square, adding at least 1cm on each side (this is depending on your preference) and score accordingly
You will need to measure now where your opening should go and marks this on the inside of the lid. To be honest, I eye-balled where I wanted to cut the oval.
You can use any shape or form for the opening, for example Spellbinder's Classic Ovals SM.
Now you will need to turn your top cover into a proper lid by adding corner. I know that some people like to cut the corners but I prefer to score them diagonally and pinch them inwards. You will need to glue the pinched section together and afterwards to the side.
At this stage I would try again of the lid fits snugly on top of your tissue box cover.
Perfect!
You can either glue the lid onto the cover or just leave it as is - as long as you do not adhere it to the original tissue box, you will be able to pull the cover off once the tissues are gone and decorate your next box with it.
Now, we come to the best part - embellishing :)
First I cut for strips using the border die from Spellbinder's Creative Book Pages Two and adhered them to the sides of the lid. I further embellished the border with self adhesive pearls from Want2Scrap.
Of course, I could not help adding a few butterflies along the way, using Spellbinder's Wonderful Wings dies from Donna's collections.

So, there you go a fantastic way to dress up your tissue box, either for yourself or made as a gift.
I am lso entering this into the fantastic linking party over at Passionately Artistic

Products used
Other products
Pens: Zig Millenium pen in black
Adhesive: Helmar, Scrapbook Adhesives


Sunday, 27 November 2011

Gel-a-Tins - November DT, Pt III

Below post went love on the Gel-a-tins blog earlier.

Even though I loved using this month's brand new set ONCE UPON A TIME to create embellishments and backgrounds for layouts, I just could not help myself and whip up a very quick and easy card making use of the "Princess and Unicorn" stamp.

Stamp your image to a piece of white cardstock (or bleedproof paper) and colour with pens.
Then tear a piece of patterned paper into a rectangle shape and run an inkpad along the edges for a distressed look. Take another smaller piece of paper and cut along the edges with a pair of decorative scissor (or use a border punch).
This piece of paper will be the base for you image. When you adhere it to the background, make sure to leave a little space to enable you to tuck a journaling card behind paper and image.
For the final touch, adhere the image to the background using adhesive foam dots to raise it slightly. Then you want to add a sentiment of your choice to the card and you are done.

Told, you it was quick and easy.

Supplies:
Cardstock - Poundland
Papers - American Crafts
Journaling card - Belle Blvd
Pens - ProMarkers
Ink - Clearsnap Chalk Ink


Tuesday, 22 November 2011

Golden Oldies

Tell me, I am not the only one who sometimes reads through her old blog entries from years ago and thinks some of the posts are just too funny to be hidden in the depths of the www?

No?
Just me then, allrighty...

But in my defence, the "stroll" through memory lane generally happens when I am on the hunt for something specific, like a place previously blogged about or an occasion to which I would like to link back to.
I then find myself starting to read some of my older post, giggling like a woman possessed until Mr P pops his head around to door to see what the joke is.

I never knew that I could be funny, but when I read back on some of my older posts I cannot help laughing, thinking "did I really write that? I never knew I had it in me"

So, I was thinking once a month I am going to share one of my favourite older posts with you - you probably won't even find them funny, but that is cool...I am having a blast rummaging through the past :)
For now I leave you with a list of seven random facts about me, which was the rage about two/three years ago. You nominated seven other bloggers who had to post their random facts, etc etc
I am not really all that hot on the nominating thing, but my random facts still apply today.

Enjoy :)

  1. I am shit scared of balloons. Just don't like those suckers and children running around with balloons close to me, are my worst nightmare. Heck come to think of it - anyone holding a balloon next to me is a nightmare for me.
  2. I break wind. A.Lot. Just can't do anything about it - I am a total fart-machine. Changed my diet, all to no avail - I could possibly fart the National Anthem at will, that's how gassy I am. And unfortunately my farts do not smell of roses...TMI, I know
  3. I have issues with toilet paper - it has to hang the right way around or I get stressed. The paper always has to roll off facing me and not the wall - what's with that?? Why would ANYONE put the toilet roll in a way that the paper rolls off towards the wall...it drives me nuts and I have to change it, no matter in whose house I am. Also, in any house other than mine do I have to discard of the first 4-5 pieces of paper - simply because I don't know who touched them before and I ain't wiping toilet paper along my bits with someone else's fingerprints on...
  4. I love eating cookie and cake dough more than eating the end product. Whenever I bake a cake you will find me not just licking the bowl but "testing" the dough by the soup spoon. And by the time the cake or cookies are in the oven I am already sick from eating so much dough. 
  5. Tattoos are my obsession and I am heavily inked. My left arm is about 90% covered and I also have more ink on my legs , ankles and shoulder. 99.9% of the images relate to the Native American. 
  6. I used to smoke a lot - about 20 ciggies a day. Started when I was a Teenager and stopped eleven years ago. Do I miss it? Sometimes I think "a smoke would be nice now" but as soon as I smell it, it makes me gag. I cannot image starting to smoke again.
  7.  I do not have a drivers license nor am I even thinking of getting one. There never was a need for me to have one and I think public transport is better than people give it credit for. My life does not need a car in it.

Sunday, 20 November 2011

Gel-a-Tins - November DT, Pt II

The below post went live on the Gel-A-Tins Blog earlier:

I had lots of fun this month creating my own background with the "Fairy Castle" stamp of the brand new ONCE UPON A TIME set to create this layout, showing yours truly digging away at the beach to create my very own sandcastle.
First I used a generous helping of walnut spray and spritzed it randomly over an 8.5 x 11 sheet of white cardstock. While the spray was still wet I sprinkled a few pieces of white embossing powder over it and set my heatgun to work. I love the effect the white embossed areas give to the overall look of the page.

I then decided where I wanted to place the photograph and stamped the image around the area in a slightly offset fashion.

All I needed to add now, were stickers and tags to add my journaling and the title.

Supplies used:
Cardstock - Poundland
Inks - Stampin' Up
Stickers - Jenni Bowlin, Making Memories
Tags/Journaling spost - Bella Blvd, My Minds Eye


Wednesday, 16 November 2011

Crochet - The Slipper-Socks

I am currently totally into crocheting socks again.

Whilst there have been failures along the way (too small, too big, too ugly, too scratchy, too thin, too thick), I think I have found my "rhythm" now and am almost at a stage where I do not have to refer back to my instructions from this book:
Source: Amazon

Yes, some of the socks look ghastly, but if you ignore the colour combinations of some of them you will find that they are actually really fun to do.

It is pretty much one basic pattern with a few different twists but at the moment I am just sticking with the basic sock. You may have seen my previous pairs crocheted here but this time I wanted to do something a little different.
I decided not to stitch the cuff together but leave it open and adorn it with some buttons - I call these my slipper socks as the yarn makes them very durable and they are perfect to be worn like slippers around the house.

Since I finished the slipper socks, I started on another pair using some gorgeous 50/50 wool /arcylic mix which I picked up at John Lewis the other day. 
The yarn is Wendy Norse Chunky and it retails at around £2.80 per 50g.
Unfortunately it has a very low running length and it looks like my new socks will turn out to be quite expensive in the end...but the yarn feels soooooooooooo great!
If  you look very closely you may be able to spot that I have used a different stitch for the main body of he sock and so far I am loving it.

And because one WIP project is never enough for me, I also have a scarf on the go, making use of all my leftover Patons Smoothie DK yarns and following the awesome and super-easy pattern from Anazard

So, now I need your help - I have these scrummy balls of Sidar yarn waiting to be used but I just cannot make up my mind as to how... I have more scarves than I will ever be able to wear, I don't need more socks or pillow cases or blankets - so, what's a girl to do?

If you have any suggestions for me that would be great and if you have a link to a specific pattern which you think may work well with those yarns I would be even so grateful of you link me up in the comments section.

In the meantime, check out some other Creative Spaces HERE

Monday, 14 November 2011

Gel-a-Tins - November DT, Pt I

The below post went live on the Gel-a-Tins blog earlier.

If, like me, you do not have children you may wonder sometimes on how to make use of specific stamp sets that are geared towards kids' pages or cards.

During November I hope to show you that cute sets like the brand new ONCE UPON A TIME can be used in so many ways and are certainly not restrictive at all.
As soon as I saw the set I was taken by the gorgeous flower stem and knew immediately that I wanted this to become an important feature of my layout. I just LOVE fussy cutting images and the flower stem is perfect to be turned into an embellishment.
I tucked each of the hand cut stems underneath the papers edge and adhered them to the background with the aid of some adhesive dots, to get some dimension by raising the images.
As you have probably noticed, I love to layer papers and embellishments on my layouts and thought that adding the sentiment "One Upon a Time" from the set, would look really cute tucked underneath one of the background papers.
Supplies used:
Papers - Authentique
Stickers - American Crafts, Jenni Bowlin
Vellum Butterflies - Jenni Bowlin
Inks - Stampin' Up
Other - Gesso, Punchinella, Walnut Spray


Sunday, 13 November 2011

Donna Salazar Nov I

This post went live earlier on the Donna Salazar Designs Blog.

Today I have a post for Donna Salazar Designs with a step-by-step tutorial on how to create this funky mini pizza box.
I found the original instructions for this gift box on Splitcoast Stampers.

This month, we are focussing on gifts, Christmas cards and home décor, so when I found the instructions for this gift box I was all over it :)))
I am always on the look out for different kind of gift wrapping/boxes that are not specific for any season.

Anyway, let's get started.
First you need a sheet of double sided paper (or cardstock) of 6 x 11" size.
I chose the Weathered Winter sheet from the same named CHA2010 paperline

Once cut to size you will need to score the sheet (6" width facing upwards) at 1" and 5" downwards

Then flip the sheet to the side so the 11" width is facing upwards and score at 1", 5", 6" and 10"

Now you will need to cut into the sides for the flaps

If you want to you can spritz some ink onto the paper before you start adhering the edges together.

Place some double-sided adhesive tape onto the edges of the flaps

The flaps will go inwards and once adhered will create a corner such as this.

And this is how it looks in its more bare stages, before my favourite part -  the embellishing - starts.

First I created a border by cutting three strips from the Spring Sky paper using the Creative Book Pages 2 border die.

I added some scrummy bling lines from Want2Scrap to the sides (which also hides - quite cleverly - the part where the border ends meet)

And here is the box in full frontal and half tilted view.


I hope you enjoyed this tutorial 

Products used
Other products
Pens: Uniball Signo in black
Adhesive: Scrapbook Adhesives, KI Gloo