Wednesday, 29 June 2011

Twisted Sketches #108


Another week and another sketch over at {{Twisted Sketches}}.

I have to admit that this week's twist "water" did give me a little headache as I don't really have any pictures that focus on water. So I was thinking along the route of maybe doing something with watercolours, but then realised that I don't have any watercolours....so, what's a girl to do?

When I flicked through my photo's I found one depicting the Needles, the famous Isle of Wight landmark and as they are sticking out of the water, I had my connection to the twist :)
Product used above, sponsored by Papermaze:
Papers: October Afternoon - "Lemon Drops", "Rock Candy"
Journaling Cards: Crate Paper - "Accent Cuts Emma's Shoppe"
Stickers: October Afternoon - "5 & Dime Playtime"

If you want to check out what the other Sister's created, have a look see {{here}}

Tuesday, 28 June 2011

Dance Like Nobody Is Watching

Hello, it is my turn again to post for Donna Salazar Designs with a step-by-step tutorial on how to create this multi-layered layout.

**click on image to enlarge **

In addition to various scraps from the Antiquities paper line and some Smooch Spritz you will need the following tools and products to re-create this project:
  • Paper trimmer/scissors/craft knife
  • Cardstock
  • Inks
  • Double-sided adhesive tape
  • Scoring board
  • Medium sized tag
  • Circle punches of various sizes
  • Journaling pens in black and white
First, take a plain sheet of cardstock and spray it with a generous helping of Smooch Spritz in River Mossy
While you wait for the  Smooch Spritz to dry (which incidentally is a very quick process), you may want to prepare some paperstrips to create the rosette-flowers.
I decided to make use of the Die-cut Ribbons paper, which will leave you with this fantastic lot of scalloped strips
Get you scoring board/tool out, or alternatively just use a bone folder and a ruler to score along each scallop

Don't worry abut lining it up at numbered intervals, as long as the top and bottom scallop match up, you are good to go. To achieve the accordion fold, flip the strip over after each score, as this will make it so much easier for you later on to fold the rosette.

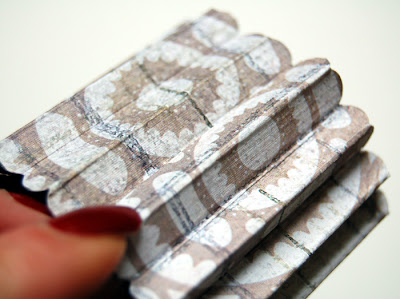
Once you have scored the whole strip, fold it carefully in accordion style, like this
Now you want to join the ends by placing a piece of double-sided adhesive tape to one end
Peel off the backing paper and join the two ends like this

Now you will have a cylindrical shape in front of you, gather the top end and push it gently towards the middle and downwards
Once you have pushed the rosette all the way down, you will find that unless you secure it, it will bounce back up and you are left with the cylindrical shape again. I prepare myself by punching a selection of 1" circles from patterned paper and cardstock, adding a large glue dot to the middle.
Once I have pushed the rosette downwards, I keep it pressed down with one hand, take one of the "glued-up" circles and press this firmly onto the middle section of the rosette
You will also need to secure the back of the rosette in the same way, otherwise it may eventually raise itself upwards again. As the back will not be visible you can use cardstock or paperscraps. The secured back part of the rosette will also double as the area which will be adhered to your project, either with a further glue dot or adhesive foam pads.
While preparing a selection of rosettes for this layout, I noticed that for some reason, the wider 2" paper strips tear apart when you try to push them down, while the 1" strips are fine. It seems that for the larger sized rosettes you will need a longer length than just 12", otherwise your rosette will end up looking like this
I was not going to waste this half-fold and decided to layer two smaller rosettes on top - it worked out well, I think.

For the rest of the layout, I added paper scraps and layered them underneath the rosettes and on the top right to ensure that the eye is guided through the layout.
I hope you enjoyed this tutorial and that I could inspire you to try your hand at layering papers and rosettes.

Products used
Other products
Stickers: Jillybean, Dymo
Pens - Uniball Signo in white, Zig Millenium in black
Cardstock - Poundland
Tools - Scor-it All, Circle Punches

Sunday, 26 June 2011

Crochet - FP Yay

Today I have a double-whammy of YAY's as I finished not one but two pieces of clothing during the last four weeks.

You may recall this post when I asked what the WIP on show could possibly end up as - and my buddy Trace actually got it spot on (you can't fool a a fellow hooker...)
It's a wrap!

To tell you the truth, I struggled a lot when I had to figure out how to get the top line half squares done. As I did not work to a pattern but crocheted the wrap as I hooked along, I was pretty much on my own. At times I just wanted to give up but I persevered. And now I am glad I did.

Yarns used:
Patons Fab DK in #2331 Beige (200g), #2308 Camel (200g) and #2308 Brown (50g)
Hook size: 3.5mm
Time to complete: Three weeks


But there is more....oh yes!

Inspired once again by MeMe Rose, I wanted to make a similar poncho and as I still had some Stylecraft yarn left over, in some colours that did not work with any of the rooms in our flat, there was no stopping me.

The poncho was finished in a jiffy and so easy to do, that I can see a few more of them popping up in the future


Yarns used:
Stylecraft Special DK in #1034 Sherbet (100g), #1019 Cloud Blue (100g), #1316 Spring Green (100g), #1422 Aspen (100g), #1023 Raspberry (50g) and #1061 Plum (50g)
Hook size: 4.0mm
Time to complete: Two weeks

Both, wrap and poncho are currently available to purchase in my Folksy store

Friday, 24 June 2011

Duck Tales

Most of you have probably figured out by now that Mr P. and I can be somewhat quirky and childish, right? 
Well, there is nothing wrong with embracing your inner child and once in a while you just have to give in to a little bit of silly.

So, here is the story of Duckie.

Duckie came to live with us towards the end of last year, when I decided that I wanted to collect rubber ducks. He is definitely my favourite and that shows as he has a specific and prominent place in the bathroom.
Duckie resides on top of our chest of drawers, sat right in the middle of it.

Now, why is it important that he sits right in the middle? Purely because Mr. P had the tendency to move Duckie a little to the left or right, back or front, when he used the top of the drawer to leave some of his stuff on there, while he was in the bathroom.

Now I am REALLY anal about how and where things have to be (I would say I am borderline OCD in that respect). So, whenever I went into the bathroom and saw that Duckie was not moved back into the middle of his space, I hyperventilated.
And as it continued, I flipped - well, not flipped as in "foaming-at-the-mouth-sword-in-hand-screaming". But as in "nagging-the-crap-out-of-Mr-P-for-not-moving-things-back-into-place".

Mr P. actually thought it was hilarious that it bothered me so much and started his little game with Duckie and me. Once in a while Duckie disappeared from his usual spot and was placed somewhere else within the bathroom...

On top of the pot-pourie


Inside my bathrobe


And the other day I found Duckie hanging from the ceiling.... I could not bring myself to take a picture of that one, even though it made me giggle at the time.

Mr P. is trying to find places within the bathroom that are not quite so obvious but so far I managed to spot Duckie within the matter of seconds. and recently I chimed in and started finding little hiding spots of my own, where Mr P had to find Duckie.

As we have exhausted the possibilities in the bathroom, we are thinking of extending the "Duckie-hide-and-seek" to the rest of the house.

Never let it be said that we haven't got exciting games going on in this household :)))))

Wednesday, 22 June 2011

Crochet - FP Yay

Finally a big YAY moment for me because I finally finished Bluey!!!!
In never thought I'd see the day and since I started the blanket way back in March, I have had some moments when I started to get really fed up with it.

Whenever I thought I was done and threw the blanket over the bed for a last check up, I noticed yet another line of squares had to be added.
In the last row of squares I also made a mistake at alternating colours but once the blanket was up on the bed, I could not find it anymore - so all is well.

My bedroom blanket is finally done - YAY, me!
Yarn used
Patons Fab DK in #2301 Glacier Blue (600g), #2315 Turqouise (600g), #2312 Airforce (600g) and #2306 White (400g)
Hook size: 3.0mm
Time to complete: 4 months

Monday, 20 June 2011

Makes Me Happy....

...this gorgeous little tea pot.


I have pretty much gone off coffee the last couple of months and enjoy nothing more but a nice cuppa or two, poured out of this sweet pot.

Also, it makes me happy that I finished a layout for this fun challenge site.  Granted, if you are not German it won't be fun for you to participate. The idea is to be inspired by some really famous German Children/Teenager Audio tapes. I used to love those when I was younger and this site brings back memories.

For challenge #1 we were asked to be inspired by the title of one of the many audio plays and I chose
Benjamin Bluemchen Folge 5 - Auf Hoher See
(Benjamin Flower - Issue 5 - On the High Seas)

How better fitting than to scrap a picture of me enjoying the life on board Queen Mary 2.

Both the memories of my childhood and of my holiday, make me happy.

What makes you happy?

Saturday, 18 June 2011

A re-cap

Where oh where did the last week go?
I blinked and it was over and done with - not only that, June is already half way through. Is it just me or does life in general seem to whizz by these days?

Anyway, I have a few pictures to share from the last week or two.

Mr P. and I enjoyed a log weekend last week as I took Thursday, Friday and Monday off. You see, it was the time again for the Isle of Wight Festival and the ferry I take to and from work on those days is HEAVING in a bad way with festival goers. So, I decided to stay home and what bliss it was.

On the Thursday, Mr P. and I decided to tour the Island a little, check out the places we haven't been to in a while (such as Newtown, which has a great population of all sorts of birds) and stop off in a couple of pubs along the way. Unfortunately it was a really windy day and not much fun to be out in, so after a disappointing trip to Newtown (not ONE type of bird to be seen) and an equally boring trip to Bembridge (our favourite pub had new owners and the previous awesome interior design was changed to a bright open plan area...yuk, yuk, yuk), we decided to call it a day and got back home.

At least we got one nice picture of us out of it - taken close to the Bembridge lifeboat station
The next day saw me working my behind off on our balcony, as the strong winds over the previous days meant that piles and piles of leaves were scattered all over my plants and the floor.
Two hours later, everything was spotless clean, nicely arranged and we looked forward to spend a nice evening on our balcony....yeah, right.
That's when the  bad weather hit us once again - all throughout Saturday it was extremely windy with scatters of rain and Sunday felt like the world is coming to an end. It rained NON-STOP from morning through to the night and the winds were at gale force.

Can you imagine how peeved I was when Monday morning greeted me with this view of my balcony?
As all the leaves were still wet, there was no chance for me to sweep them up on the day, so I hoped for a few more days of sun - but it was not to be.
We have had nothing but wind and rain since and right now my plants are drowning. Every time I want to go out and get rid of the surplus water in the pots, another shower hits...rats!!!!

At least staying indoors meant I could carry on scrapping and crocheting, both of which I did to the full :)
I have quite a few FP's to share, for today here is one I finished shortly before I went on my working voyage at the end of May.

Front of pillow case:
Back of pillow case:
The yarns I used were left overs, some are Stylecraft DK, some where a special baby yarn pack from Lidl.
The front pattern is the #35 Tricolour Square from the following book

Well, that's it for now - I will be spending most of this weekend finishing of some assignments (my Papermaze DT pack came the other day and I have been ITCHING to play) and take pictures of a few crochet FP's - two items of which will be available to purchase in my FOLKSY

Wednesday, 15 June 2011

Twisted Sketches #106


Finally, I am back playing along with {{Twisted Sketches}} again - yay! Even though I only missed one sketch, it feels like a lifetime that I posted a layout for the challenges here.

I really loved this weeks sketch and the twist "shine" was used within my title...clever, hu?
Papers: Donna Salazar for GCD Studios
Stickers: Rusty Pickle, Sassafras Lass

Check out the sketch and the other Sister's take {{here}}

Monday, 13 June 2011

My Dad

"Hello, this is Kim Sonksen sharing a layout created with the fantastic {{Antiques}} paper line for Donna Salazar Designs.
I simple adore how Donna combines masculine with feminine designs, which makes her papers so versatile and easy to use.Not only do you have the fabulous {{Steam-punk Gentleman}} but within the same collection you will find {{Time For Tea}}. Then we have the {{Vintage Gears}} and the {{Theater}} - like I said, there is a feminine paper for every masculine one. Donna provides the Ying with the Yang which makes for a very relaxed scrapping experience.

But I digress - let's get one with some crafting, right?

This month we are focusing on Dads and mine is a truly wonderful man. Not my biological father but the best Dad a girl can have and I love him dearly. He is now in his 77th year and as cheeky as ever - the picture I have used is SO him, always a wicked laugh on his lips, because he usually plots something or the other.

The {{Antiques}} paper line works fabulous for a masculine layout and the colours in the photograph practically begged for this picture to be combined with these papers.

I used a combination of Wood Stain, Caramel Latte and River Mossy {{Smooch Spritz}} on the cardstock to make sure it works with the colour combination of the papers and the picture. I also used the Caramel Latte to tone down the brightness of the clock  from the {{Time For Tea}} paper, sticking out from underneath the top of the picture - works great, doesn't it?

** click on image to enlarge ** 

The paper strips like the worn ruler from the {{Tags, Ribbons & Mosaics}} paper gave me the idea that the edges of the photograph should look a tiny bit more distressed, so I used a file to rough up the edges and went over them first with Chestnut Roan chalk ink from {{Clearsnap}} and a second layer of Dark Brown. It looks almost like rust....perfect mach for the ruler edge, me thinks.

The title letters were also distressed with a helping of Smooch Spritz in Wood Stain & Caramel Latte and finished off with a topping of chalk ink in Dark Brown. I added a few white lines to indicate highlights on the letters and adhered them to the background with adhesive foam.

I hope you enjoyed this weeks posts from me and maybe you like to visit my blog"


Products used
Other products
Embroidery Floss - unknown
Cardstock - Stampin' Up
Pens - Uniball Signo in white, Zig Millenium in black
Pearls/Rhinestones - unknown
Stickers - Jenni Bowlin

Saturday, 11 June 2011

Upsy Daisy Designs - DT June Pt II


In the UK we celebrate Father's Day in a few days (the 19th of June, to be exact), so my seond DT assignment this month was a no-brainer: a Father's Day card.

Many of {Upsy Daisy Designs} papers are perfect to be used for masculine projects, such as the ones from the {Home Sweet Home} line and I created this card in no time at all.

**click on image to enlarge**
UDD products used:
Papers Home Sweet Home: #HSH013. Cedar Cres, #HSH013. Cedar Cres

Have you done your Father's Day cards yet? If not, you better hurry!

Thursday, 9 June 2011

Papermaze DT - June Pt II

For my second assignment this month I have gone mad on circles. You may have noticed that I love using using circles on my layouts, right?

Well, then you better check out {this post} on the Papermaze blog and see how I ended up with this layout:

** click on image to enlarge **

See that bubble wrap stamping? It is a {new stamp} from Kaisercraft - isn't that just wicked??!? No more hunting for usable bubble wrap, just get your stamp out - and it is really affordable at only £2.99!!

Tuesday, 7 June 2011

Upsy Daisy Designs - DT June Pt I

At {Upsy Daisy Designs} this month, the DT was challenged to create a project following inspiration from an advert. I ♥♥♥ working from adverts and this one totally tickled my creative tastebuds

Advert found via Google Images

I used both, the colour scheme and the circles as a starting point for my layout and I am mighty pleased how it turned out

** click on image to enlarge **
Products used:
Papers - Upsy Daisy Designs: Avalanche - #AVA013. Grind, #AVA012. Extreme, Home Sweet Home - #HSH012. Beach, #HSH013. Cedar Cres, #HSH015. Midland Ave


See that flower? I used some bakers twine and crocheted it from scratch and secured the button with the help of a glue dot. Not bad, eh?

Sunday, 5 June 2011

I am back!

Wow, what a trip it has been - for the last ten days I have been working on board Queen Mary 2 and it was a real eye opener. The girls and boys on board work so hard: 10 - 12 hours every day, without a weekend in between and each contract generally last for about 6 months. Some of them have not set a foot on land in that time.

After 7 days I started to feel the tiredness creeping in and almost fell asleep in the chair, when I visited my parents....but regardless of the working hours, I really enjoyed my time and in all honesty, if I would not be in a relationship, I would want to work on board.

I have been able to escort a few Shore Excursions in Stavanger, Oslo and Denmark and once I have uploaded the pictures I will share them on the blog.

Until then I leave you with a layout I created this month for Papermaze, focussing on Monochromatics.
You can see the full post {here}

**click on image to enlarge**

Friday, 3 June 2011

Crochet FP

Yup, believe it or not I actually DID finish some crochet projects over the last couple of weeks, so let me show you some.

You may recall THIS POST, about my WIP's and I am pleased to show that this is now a completed cushion cover. Made from scratch with no written instructions.

For the first time I also tried myself at making a button closure at the back of the cushion - again with no instructions, I just made it up as I went along and I think it worked out not too shabby.In hindsight, I could have added a row or two more to avoid the buttons pulling so much, but on the other hand, it give it almost a scalloped edge, no?


I love how the Granny Square and the Granny Stripe cushions look together
And nope, the cushion covers are not wonky, we are actually using the cushions to rest our heads on, so they are well used, well loved and well scrunched up :)

Then I had some left over yarn and it was much to pretty to just discard it...what's a hooker to do? Easy, just tie all the left overs together into one ball and crochet away...which is what I did for this armrest cover. Works perfect with the Granny Stripe cushion, don't you think?